3D printing with Metals
by Fernando Ribeiro
Universidade do Minho Industrial Electronics Dep. Campus de Azurém 4800 Guimarães PORTUGAL
Rapid Prototyping is a recently developed technique that ‘prints’ a component, instead of manufacturing it in traditional terms, by using materials ranging from photopolymers to thermoplastics, including paper. Since these materials are in most cases not suitable for assessement purposes a new approach has been created. It has similar ‘build up’ technique but uses metal as raw material. The process entails the use of a gas metal arc fusion welding robot which deposits successive layers of metal in such a way that it forms a 3D solid component. This process can also be considered a manufacturing process for low volume production.
INTRODUCTION
It takes many months or sometimes years from the time that a company takes the decision to introduce a new product to the market until the product reaches that market. It would be very desirable to reduce this product-development cycle time in order to make the company more competitive and able to respond to changes in the market as quickly as possible. During the development cycle time, the task that often takes longest is the production of prototype components which may itself be costly and time consuming but also delays testing. If the prototype performance is not adequate the design may have to be changed and the prototype reproduced until it meets the design specification and executes the task for which it is intended. The design engineer would often prefer to see a physical model of the component in hours instead of weeks. It is also possible that the product cost can be reduced, with superior quality. Extra time will also be available to the design engineers to improve the quality and also to study new ways of producing the product in a more cost-effective way. To achieve this, a relatively new technology has being created and although there is no standard name for it yet, it is most commonly known as Rapid Prototyping (RP), solid freeform fabrication, layer manufacturing technology, near net manufacture or even 3D printing system. Rapid Prototyping has been growing very quickly, and some processes are commercially available like stereolithography, laminated object manufacturing (LOM) or fused deposition modelling (FDM).
The advantages are tremendous and some of them are:
- The production time of a prototype is drastically shortened from months to weeks or even days.
- These techniques are ‘automatic’ meaning less need to have a skilled operative, and it is also possible to leave the system working with little supervision around the clock.
- Since these machines work as additive processes they are less wasteful of materials.
- It is very easy to implement changes in the component since this is electronically drawn in a CAD package, being only necessary to ‘reprint’ it.
- More than one part can be made at once, that number being limited only by the size of the working area.
- But traditional RP processes also have some disadvantages like:
- The maximum size of the prototype is limited by the machine working volume.
- All these systems are very costly, well over £100,000 minimum each.
- It is not always possible to make the prototype in the material required for final component (most of these techniques use wax, photopolymers, thermoplastics and ceramics or even paper for the initial model). Techniques which prototype components in 100% metal are not common although some attempts have been made.

Fig. 1 ‘Square component’ being ‘printed’ by rapid prototyping using fusion welding
To overcome these problems a technique for rapid prototyping components using robotic arc welding has been investigated at Cranfield University (UK) and is presented here. In this process the component is formed by melting and depositing the metal using the GMA welding process. A CAD drawing system is used to create the initial solid shape and a welding robot is used to manipulate the welding torch according to the component design. Another objective was to create a low price system since most traditional RP systems are very expensive. All the software runs on PC platform to reduce computer costs. Fig. 1 shows a component being ‘3D printed’ using robotic arc welding. Sometimes, it is very important not only to observe the prototype but also to test it and sometimes to use it to check its operability. For most industries, rapid prototyped samples have limited mechanical, thermal and chemical properties of the materials that can be manufactured (such as polymers, wax, nylon, paper, etc.). Since it is very important in some industries to make and test metallic components, a new rapid prototyping technique was necessary allowing metals to be deposited directly. To test parts, a CAD program or mathematical simulation package could be used, but as Phillip Ulerich said: ‘I find people need to fondle parts before they really understand them. Drawings just don’t do it’. It is therefore important to have the component in our hands to understand it. The technique presented in this article tries to solve the main limitations of traditional rapid prototyping processes and incorporates some new techniques for automating the process and these have proved to be extremely successful. With this process, metallic components were made with acceptable surface finish, acceptable structural conditions, in a shorter period of time and cheaper by avoiding the use of moulds. This process can also be a manufacturing technique for low volume production.
HOW THE PROCESS WORKS
The preprocessing of this rapid prototyping process is similar to traditional rapid prototyping processes. First the component is drawn as a 3D solid model in a CAD system. The design is created by the designer according to their requirements. Then, information relative to the component has to be ‘input’ into the system (part features parameters) like the part name, width, sequential order of build up, welding torch orientation, etc. Some of this information will then be used to generate automatically the appropriate welding parameters.

Fig. 2 Part features input screen
Fig. 2 shows the add-on part features input screen. All the empty fields in the Figure are automatically filled in according to the other input values. From all the other ones, only three have to be input for every component, all the others being assumed as default values which almost never change. Then, the solid model is electronically sliced by an AutoCAD add-on. It generates lines/polylines which represent the robot path necessary to make the component. Fig. 3 shows a sequence of drawings for a simple component and its resulting slices. These welding parameters are automatically generated and were derived from welding studies carried out by Norrish 1 and parametric equations generated by Ogunbiyi and Norrish 2.

Fig. 3 (left to write) Cross-section drawing (side view), its revolution (orthogonal view), final solid shaded, solid model with resulting slices (blue lines)
After the slices are generated, four outputs are created: the polylines as a DXF file (only required to export should a simulation be needed), the robot program (ARLA language for ABB robots), and two reports containing instructions relating to the component itself: one is for the welding technician and contains welding instructions and values for each layer (time, height, etc.); the other is for the production manager and contains information like the time it will take to build, the quantity of material needed, etc. The robot program is then compiled and download to the robot. Before the robot program is downloaded to the actual robot, it can be simulated with the use of a robot simulation program to check for collisions or other problems such as access, although this task is not compulsory. The robot program may then be modified if necessary. Fig. 4 shows a simulation picture of a robot making a vase.
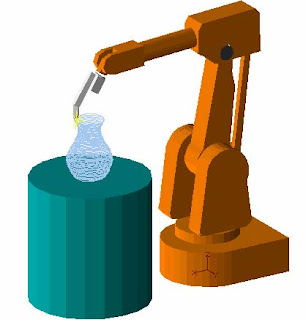
Fig. 4 Simulation picture of a vase being made
The robot program (in text format) is then compiled and downloaded to the robot via a serial cable through the RS 232C port of the computer. A special program is necessary to perform this task since this robot only reads binary code. This particular binary file format is unique to each robot manufacturer. After setting up all the required consumables the robot is ready to start welding or in other words to start building up the component as far as the welding system is operational. It is important to point out that the metal to be used is entirely for the user to select. To build a component, a metal baseplate is necessary on which the beads will be deposited. That base can be of any metal as long as it is welding compatible with the welding wire. Fig. 5 shows a flowchart with each step of this process. Each colour represents a different task or a different software package used. Each box represents an action to be taken, information about a certain entity or even an information end user. The arrows show the direction of information flow.

Fig. 5 'Rapid prototyping using fusion welding' concept
HARDWARE INVOLVED
A graphical description of the rapid prototyping hardware used is shown in Fig. 6. The dotted arrows represent ideal situations and not the real work cell.
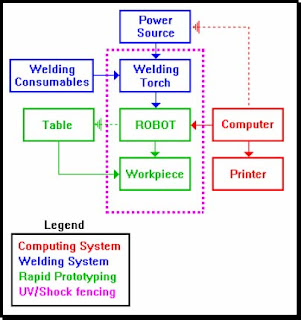
Fig. 6 Rapid prototyping work cell hardware
A computer is connected to the robot controller via a serial cable RS 232C and also to a printer. The power source and welding consumables are connected to the welding torch which is mounted on the robot arm. The robot builds the component on a table. This table should ideally be controlled by the robot (broken arrow). The individual components of the system used here are:
- An ASEA IRb 2000 robot from ABB. This is not a welding robot but a six degrees of freedom robot with an S3 controller. It only has 64 Kbytes of memory, and this represents a major limitation in the number of programs which can be stored in it.
- A turntable could be used, either a stand alone or a robot linked one, although a robot controlled one is advised.
- The power source used was a Migatronic BDH 320, although some tests were later on carried out with a Migatronic BDH 550. The welding torch was a Binzel Pushpull torch.
- The computer used for the CAD, off-line programming and downloading was a PC with an Intel 80486 microprocessor running at 66 MHz with 16 Mbytes of RAM memory. The hard-disk capacity was 250 Mbytes.
- The whole work cell has a fence around it with glass containing an ultra violet (UV) filter to protect the eyes of the operators in the environment. The robot and table alone had another fence with another UV filter. This second fence protected against the physical movements of the robot (shock) and also protected the eyes from the rays. If it was opened a safety circuit would be activated and the whole system would stop working immediately.
- The consumables were all the necessary ones for a gas metal arc welding process like wire spool, welding gas and contact tips.
Fig. 7 shows the actual work cell used in this project including all the hardware.
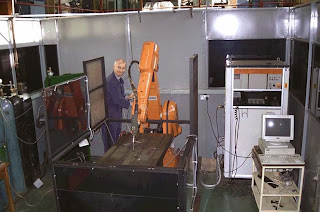
Fig. 7 ‘Rapid prototyping using fusion welding’ work cell
SOFTWARE USED
A graphical description of the rapid prototyping software used is shown in Fig. 8. The software used consisted of the AutoCAD ™ package, the ‘add-on’ developed in this work, a robot simulator package and the compiler/download ABB software to compile and download the robot program to the robot via a serial cable RS 232C.

- The main reason for using AutoCAD was its worldwide usage and its being an open system. It is very user friendly and compatible. There are also hundreds of add-on tools available for AutoCAD. AutoCAD has its own programming language which makes it
- possible to customise programs according to specific application needs. This language is known as AutoLisp and was the one used to develop the slicing routines.
- The robot simulation package used was WorkSpace 3.0. This simulation package is not essential to the process although it was used to check for collisions and timings.
- Two different packages can be used to compile and download the robot programs. OLP
3.0 (Off-Line Programming) is a DOS (Disk Operating System) program supplied by ABB which also allows the final robot program to be created directly. The second package is SPORT 1.0 which is a Windows based program developed by Lund University in Sweden which performs more or less the same functions as OLP 3.0. Both programs work with ABB robots only.
TEST SAMPLES
Some components have been chosen to be illustrated and described in this section, although several others were built up with success.
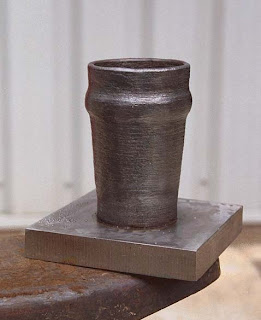
Pint Glass
This component consists of a ‘pint glass’. It took just under half an hour to draw and about 15 minutes to slice, generate the reports and the robot program. It took about an hour to build. It is about 180 mm height and weighs around 3 kg (without the base plate). The width measured in the end varied +/- 0.2 mm. This component achieved a good surface finish, very near geometrical expectations (less than 0.5 mm in height lost). The component described here can be seen in Fig. 9.
Manifolds
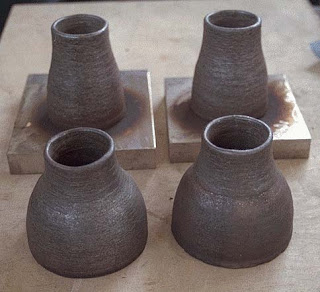
A challenge was proposed which consisted in making manifolds for a real car exhaust. Two different sizes were needed (two components each). These were drawn in a total of about 15 minutes (both) and the rest of the preprocessing (slicing, generation of welding parameters, robot program, download to the robot, etc.) took about another 15 minutes. The actual welding took around about 30 minutes each. These were welded to a base plate, but this was then cut away as can be seen in Fig. 10 (two of them are already cut from the base). In only one afternoon the four manifolds were easily made from scratch. The car owner decided to machine just their outside due to aesthetic reasons. The inside was kept as it is because the tiny line marks were used to reduce noise in the exhaust. The larger ones are about 100 mm height and 50 mm radius and the others are about 100 mm height and 35 mm radius. The final width measured varied by +/- 0.2 mm. The components described here can be seen in Fig. 10.
‘Bow Tie’ shape
This sample consists of a 200 mm tall ‘bow tie’ shape. It took about 15 minutes to draw in the CAD system, to slice, to generate the reports and to generate the robot program. It took one and a quarter hours to build. The welding parameters are of extreme importance for the final dimensions, final surface finishing and final quality and these can make the whole difference. The component described here can be seen in Fig. 11.

CAD SYSTEM
The CAD system to be used must fulfil some requirements necessary to the drawing and slicing of the solid. The main requirements for this package are:
- solid modelling and/or surface modelling facilities available
- facilities for constructive solid geometry
- must have its own programming language so that it is possible to ptogramme the slicing routines which will work as an add-on (as in Fig. 2)
- facilities for importing/exporting DXF files
- shading facilities (not compulsory but convenient).The reason for choosing AutoCAD was mainly to fulfil all these requirements plus its low cost(when compared with other CAD powerful packages such as CATIA, I-DEAS,ComputerVision, etc.), its compatibility with many other packages, its computer platform
- being PC based (meaning compatibility with lots of other software) as well as the availability of many add-on tools for different tasks. In addition, it contains a programming language which allows the user to access the graphical information database. This language is AutoLisp and was the one used to make the slicing routines. The add-on (slicing routines) were done with AutoLisp and it has a similar environment to AutoCAD. Menus are available and most of the commands are available through a simple click on the mouse. The main advantages for using it are:
- relatively easy to understand
- contains proper instructions to work in a CAD environment
- full compatibility with AutoCAD
- it is an interpreted language rather than a compiled language If other CAD packages are to be used which do not read AutoLisp code, these slicing routines need to be translated to the programming language which the CAD works with.
GEOMETRY LIMITATIONS
This technique cannot be seen as a solution for every shape. It has some limitations which are discussed here. This system is more convenient for hollow shapes than solid shapes because the programming path is easier; there is always a unique start and end and sometimes there is no solution for welding a complete layer without start/stop in between. The fewer start/stop welding instructions the better the finished quality of the component. To make a solid shape the system can start from a metal block saving material and time. Another geometry limitation is the robot working envelope. For larger components a larger robot has to be used or the shape needs to be split into sub parts, building them separately. The part could also be moved away from the robot and welding resumed after a calibration task. Simple components can be made all in one go but more complex shapes could need to be split into parts. Components that contain hanging parts can sometimes be fabricated by using a turn/tilt table. Changing the plane of the table allows the robot to weld in another direction. The turning table must be integrated with the robot and controllable through the robot program otherwise it is worthless and only complicates the process. Difficult access can sometimes be solved by using a welding torch as small as possible or by changing the orientation angle of the torch. For some components the surface finish is important while for others it might be left as it is without compromising the component’s functionality. Different materials provide different surface finish and this should be taken into account when choosing the materials. If machining can be avoided it saves a lot of time, money, effort and the elaboration of complex milling programs. The welding is done by ‘levels’ and for the robot to move from one height to the next it needs a ‘step-up’ movement. Where this movement occurs it leaves a thicker deposition in the component. This occurs because the robot spends slightly more time in the same location thus depositing more material in that place. To avoid this, a spiral technique was introduced in order to reduce that thicker location.
In some other rapid prototyping processes it is possible to make loose parts inside a component without user intervention but that is not possible to do in this metal based rapid prototyping technique. The simple reason is that every weld bead needs to ‘start’ in metal and therefore it is not possible to have loose parts unless these are placed there by the user at some stage. Some of these limitations can be overcome be changing the part design.
ROBOT
A six degrees of freedom (DOF) robot was used for better manoeuvrability (positioning and orientation) of the welding torch, although a three DOF system could be used, but not with all the advantages of the previous one. It is felt that a welding robot should be used in this system because it allows the use of welding instructions into the robot program. This facilitates the setting up of the welding parameters as well as changing them according to programme requirements. The robot program generated is a set of moving instructions with the respective co-ordinates and orientation angles. Each point or location in space uses a certain amount of program size and therefore the more points it has the longer the program gets. These robot programs could and should be optimised in order to reduce size. After slicing the solid model a text format robot program is first generated. Then, it is compiled to a binary format which uses only about one-third of the size of its corresponding text format version. The robot has a memory capacity of 64 kbytes for robot programs (in binary) which means that there is a limit in the component’s size and/or complexity. Before starting a component, the robot was used to locate the starting point (top centre table co-ordinate) for that particular component. This co-ordinate was then input into the CAD drawing to locate the shape within the work cell.
COMPARISON BETWEEN RP AND ROBOT FUSION WELDING
Traditional rapid prototyping systems are:
- Are much more expensive (any one costs over £100 000) while this new technique would be at most £50 000.
- Use very expensive specially developed materials which solidify in contact with a laser Some examples are wax, photopolymers, thermoplastics (PVC, Nylon, etc.) and ceramics in liquid or powder state. One other process uses a cheaper one (paper). A typical material for a stereolithography machine can cost $300 -$350 per gallon.
- Need a dedicated computer The computer is needed to control and guide the whole system and therefore needs to be on. Some other rapid prototyping systems do not slice the solids online but still need the computer to control the lasers during the build up (like stereolithography).
- Use expensive CAD programs with expensive hardware to run them.
- After choosing the process, there is only one company selling that specific machine, whereas with this new system, almost any industrial robot would do the task.
- This type of machine is dedicated to make prototypes while a robot can do other tasks. The robot investment is not only for making prototypes.
- Suitable for small components and have small working volumes
- Resulting files (SLA or others) are very large files and therefore difficult to transport.
- This can be a problem for companies that use a bureaux to make the component.
- The slicing is slightly different. While in traditional processes the boundary of the cross section represents the path of the building action (to cut or to solidify), in this new technique the path required is the centre line of that cross section.
- A fair comparison cannot be made between bead size of this process and stereolithography because a typical bead size in this process is measured in millimetres (0.5 -2.0 height and
- 4.0 -12.0 width) while in stereolithography is measured in micrometres.
- Although the laser solidifying the material is much faster than the welding deposition, the deposition rate is much higher in the welding process.
CONCLUSIONS
This process started as a rapid prototyping technique, but it was soon discovered it could be used as a manufacturing process for low volume production. The idea was to make prototypes in metal, not only to observe them but also to perform tests on those components. For certain shapes, it is cheaper and faster to make them with this technique rather than using stereolithography or any other traditional rapid prototyping. The investment in a system like this is somewhere near £50 000, while stereolithography equipment can cost up to £100 000. This technique can use any weldable metal; we only need to know the proper welding parameters. A database with the parameters for the most used metals could be created. This slicing method does not read SLA files (from other rapid prototyping processes). To use existing drawing files, these have to be either imported via a DXF format or redrawn in AutoCAD and then sliced with this new technique. Another important aspect to consider in this new technique is that it is possible to use different materials along the component, varying though its structural characteristics. By changing the welding filler wire, one component can be made of several different metals according to the need, as long as they are welding compatibles. This allows a component to have different levels of hardness and strength in different parts. Many industries would prefer this rather than having to have separate parts with different structural characteristics according to design and manufacturing time. Different materials were tried in this work giving different surface finishes proving that surface finishing depends very much on the material used. To properly machine the skin in an average quality component, around 0.5 mm would have to be machined out. If different hardware is to be used with this technique some aspects need consideration. For a different robot, the robot program generator needs some modifications. This will take a couple of hours only, since most of the instructions generated are ‘move’ instructions. For a different CAD program, the slicing routines need to be translated to the language used by the new CAD application. For a different robot simulation package the only requirement is the facility of reading DXF file format to read the slices. As previously said, this technique cannot be used for every kind of shape. Although solid shapes can be made, it is not the purpose of this process to make them. This technique is better for hollow shapes. This process depends very much on the welding parameters used and therefore an in-depth study should be done. In this process the slices are automatically created, the ARLA robot program generated completely automatically and it was not essential to use a robot simulation package to test it, although simulation can be used to save online time. This means that this process is very
automatic with almost no intervention from the user (except for drawing the component in aCAD system).Several components have been made 3,4,5 with perfectly acceptable quality in surface finishing,mechanical characteristics and dimensions as the case studies describe.
ACKNOWLEDGEMENTS
Many thanks to John Norrish for his support in this project and his expertise in the welding. Very special thanks to John Savill for his strong support in welding all of the components and for solving in an efficient way the practical problems which arose as well as encouraging me to new ideas. A special thank you for my wife is also deserved for her understanding during the difficult periods of this project.
1 J. Norrish: "Advanced Welding Processes", Institute of Physics Publishing, UK, 1992.
2 J. NORRISH: Ogunbiyi B., "An Adaptive Quality Control concept for robotic GMA Welding", 5th International Conference on Comp uter Technology in Welding, Paris, France, 15-16 June 1994, Paper 45.
3 Antonio Fernando Ribeiro and John Norrish, 'Practical case of Rapid Prototyping using Gas Metal Arc Welding’, Fifth International Conference on ‘Computer Technology in Welding’, TWI – The Welding Institute, Printed by Cramptons Printers, 15-16 June 1994, Paris, France, paper 55.
4 Antonio Fernando Ribeiro and Prof. John Norrish, ‘Metal Based Rapid Prototyping for More Complex Shapes’, 6th Biennial International Conference on ‘Computer T echnology in Welding’, TWI – The Welding Institute, Abington Publishing, 9-12 June 1996, Lanaken, Belgium, paper 60.
5 Antonio Fernando Ribeiro and Prof. John Norrish, ‘Case Study of Rapid Prototyping using Robot Welding - ‘Square to Round’ shape’, 27th International Symposium on Industrial Robotics, 6-8 October 1996, Milan, Italy, page 275.
